
I created this blog to help or share the transformation process of my DFM Cargo Van.
There is quite a bit of info on the Web regarding these vehicles but these vehicles are still unknown to allot of people.
Meet "Tin
Tin" ( the name came from her "tin" like body )
I purchased the Van in 2010 as new but she was a 2008 model. This meant she
stood unsold for over two years, I got her with 44km on the clock. The rumor
was that the Dealership went bust soon after importing these
vehicles from China. They were sold at next to nothing prices, but they were
not popular at all, I have no idea how many is currently in the country but I
myself have seen about 4 or 5 in the Johannesburg area.
I bought her for R59 000.00 ($5841.00). known as the DFM Cargo Van 1.3
high-roof.
The Dongfeng Motor Corporation is one of the three largest motor manufacturers in China and have numerous joint ventures that lead to the manufacture of the DFM Panel Van. Constantly being mistaken or compares to the Chana these vehicles are almost identical to each other. The only real difference is the body, front end, lights and in some cases (depending the year model) the interior like the dashboard are not identical. I have checked the undercarriage of the DFM and Chana and there is almost no difference at all. With limited shops who specialize in the spares in Johannesburg and Pretoria region you might struggle at first to get the right supplier for this vehicle. It must be said that the general spares for these vehicles are very affordable and this is a positive contribute to cost effective maintenance and general running cost.
The newer Vehicles are now called the DFSK and in the South African marked they are still very afordable. It undergo a bit of a face lift with new shape front fender and head lights


If you are intrested in more info or history of these vehicles click on the links below:
http://en.wikipedia.org/wiki/Dongfeng_Motor
http://www.dfskuk.com/latest-news/dfsk-launch-mini-vans
The smaller Cargo Van is a good idea in the market in South Africa and for the rest of the world for that matter. This is a great vehicle for small enterprise businesses but unfortunately it came with a bit of problems regarding overheating and I think it’s not suitable for the hot SA Temperatures.
I had to replace the Head gasket 3 times before she reached 50 000 km, it came at 2300km, 17200km and then at 53000km but that is a story on its own. All seems to be OK for now and the water is checked daily. I will create another link regarding the possible solutions to the overheating issues of these vehicles once it is done or you are welcome to email me and I will reply.
Transformation
Background:


This little van crawled into my heart very quick. Extremely fuel sufficient at approx 12 km/Litre she is not fast but I have always reached my destination.
Everyone that knows me know how valuable she has become over the years for her loading capacity. And used very frequently for fishing trips and other weekend trips.


My decision to re-spray came about 2 years ago as I one day
spotted some white rust on the roof from a apartment. The paint work of this
vehicle was done very poorly and I think the South African weather is not very
"forgiving" if it comes to only one layer of paint. If Dong Feng could do a bit more effort in spraying these vehicle in the factory when they are manufactured this could be great. The paint started
to fade when she was only 3 years old and there was nothing I could do. It was
about a year ago that I started to notice extreme rust on the roof and other
bits of the vehicle


I
also tried my hand at spray painting and my idea was to make the window inserts
black to give a tinted window effect but it didn't come out quite as planned
and that my spray job was just to bad.
So this time I am getting a professional to help.
So this time I am getting a professional to help.


24 April 2014
I also had minor damage to the right
side of the vehicle and on the front and rear fender needed some attention. There was minor dents and scratches also and with a
bit of good old panel beating and body filler did the trick here and this will
form part of the preparations for the complete spray job and transition to the
new look.


Using a limited Budget I repaired
the front fender. The broken pieces was removed and useing a soldering
iron we melted other plastic into shape and used other pieces to join these sections.
We continued to sand this down and
filled in with body filler.


The
Rear fender required attention and we used the same process of melting the
plastic within the crack, joining the two pieces wit other plastic. This get
sanded down and Body Filler is used with some hardener to make it strong but
flexible. I decided that since these vehicles come out with
Black Plastic fenders I am going to Colour code them the same as the rest of the
vehicle. So allot of sanding and smoothing out and then a layer of Plastic
Primer will be added before the final Base coat and clear coat (Lacquer)


26 April 2014
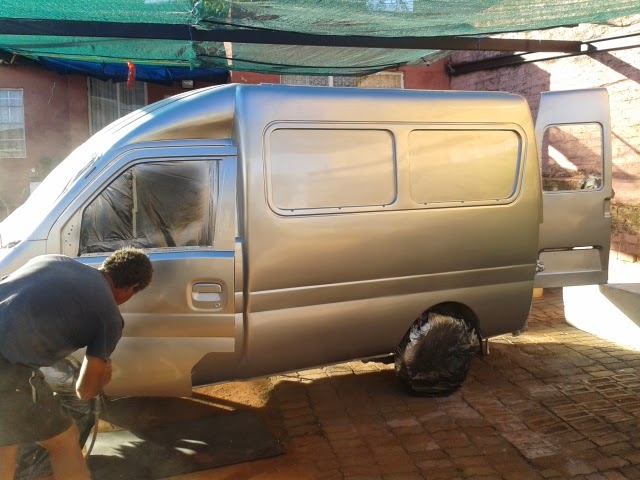
So today we made good progress. Tin Tin was "masked up" and the rear windows removed. She got a grey base coat to establish if there are any smaller body work and touch ups required. With a careful eye and a black marker, all the pit marks and other small marks was marked so more body filler can be applied.


The rear fenders came out stunning, the fenders was sanded down with a 400P and then plastic primer was applied to ensure the new paint will set well. These are then masked up so that we still keep the black trimming inside the new silver all around. I decided for the Fenders I need to break the silver with some black.


The Rear fender is also used as a step to get into the back so I will keep the top section Black


So we completed the paintwork. Because this paintwork was not done in a spray booth there will be a lot of dust particles on the body. The paint work will be left for about 7 days to cure and then the polishing process will begin. The body will be "flattened" with a 1500p- 2000p sandpaper, and special polish paste will be applied and with the use of a Air-buffing machine she will be buffed to get the final shine.en polish will be used and buffing machine to get the final shine.


The fenders was completed and I was very exited to remove the the masking. The black and silver came out perfect.


29 April 2014
So today we assembled all the parts. It is very rewarding to see all the puzzles coming together and here she is:
The new TinTin with a brand new look!


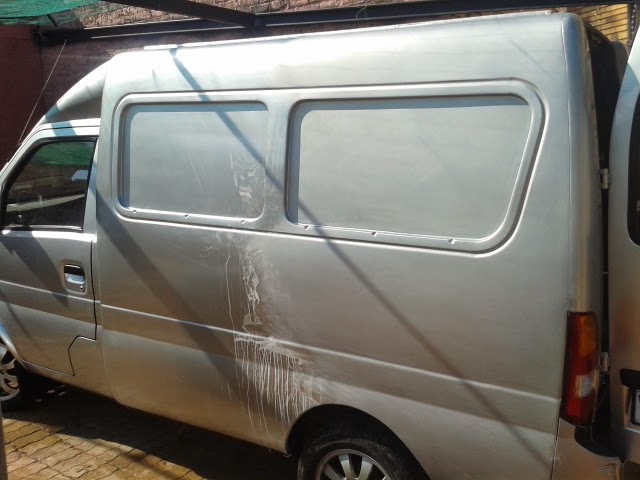
So in a weeks time we'll do the buff and polish and then for the final pics. here is a photo to try and show how awesome the paintwork came out, it was taken with a mobile phone close up but its the best I could do at the time :) This is a polished section of the panels but it reflect the true color but the metallic is also visable.

1 May 2014
Upholstery
Upholstery
The interior is now the next step. I purchased some upholstery for the panels to redo these. The rear interior will be lined with acoustic fabric.


I started to remove the back door panels and used plastic sheeting to cut out the panels, drill the holes and then used Genkem adhesive to glue the material to the panel. I used a lid from a Aerosol can to make the round corners. These were cut with a Stanley knife.


I will use the acoustic fabric to line out the rear of the van to add aesthetics and this in return will contribute to reducing noise.


There are two large panels on either side of the rear that will be covered with the grey upholstery also.


2 - 4 May 2014
All panels completed. I paded the front panels with a layer foam and it looked so much better than the original.
I used genkem adhesive to stick the fabric and wrap it over the sides. My son Rynhard loved helping me with this. The holes was marked and drilled through the plastic sheet and a small incision was made with a blade so the screw can fit trough. I did not want to risk riping the fabric by drilling a hole and I didn't have a hole-punch at hand.


I also installed 2 x Gaslifts for the rear doors. The gas lifts was specially made up by the Gabriel Suppliers: Diesel Electric. The were pumped up at 100 nm as this was the lowest I could get them done. They are still very hard to close but it keeps the doors open in Windy conditions and this was the main purpose.


Whilst the Interior is still underway I will update this blog as I continue. I have now started concentrating on the Airbrushing design on the side of the vehicle, for this I will create a complete new blog: click on this link below and it will take you to the Airbrushing Blog:
new panel
2 - 4 May 2014
All panels completed. I paded the front panels with a layer foam and it looked so much better than the original.
I used genkem adhesive to stick the fabric and wrap it over the sides. My son Rynhard loved helping me with this. The holes was marked and drilled through the plastic sheet and a small incision was made with a blade so the screw can fit trough. I did not want to risk riping the fabric by drilling a hole and I didn't have a hole-punch at hand.
Here are the doors completed
Whilst the Interior is still underway I will update this blog as I continue. I have now started concentrating on the Airbrushing design on the side of the vehicle, for this I will create a complete new blog: click on this link below and it will take you to the Airbrushing Blog:
Airbrushing DFM Panel van
Please feel welcome to leave
comments and share any info you might have regarding these little vans.
I think this is the great blog dedicated to cargo vans who are interested to transform their vans.Each step with image is greatly described which is makes this blog stand apart.So i will suggest you to keep the stuff same.
ReplyDeleteRegards,
http://www.the-van-man.com
Pls give me tips to keep my DFM cargo van cool :-(
ReplyDeleteDoes any one out there know where to buy anymore.. Or even knew.. We have one and love it but dont have time to fix it up.. We need another one asap pls email corals100@gmail.com
ReplyDeleteHi Coraleigh, where are you from. you in South Africa ?
Deletesend em a email on gerrie7407@gmail. My van may be for sale, but i have electronic issues